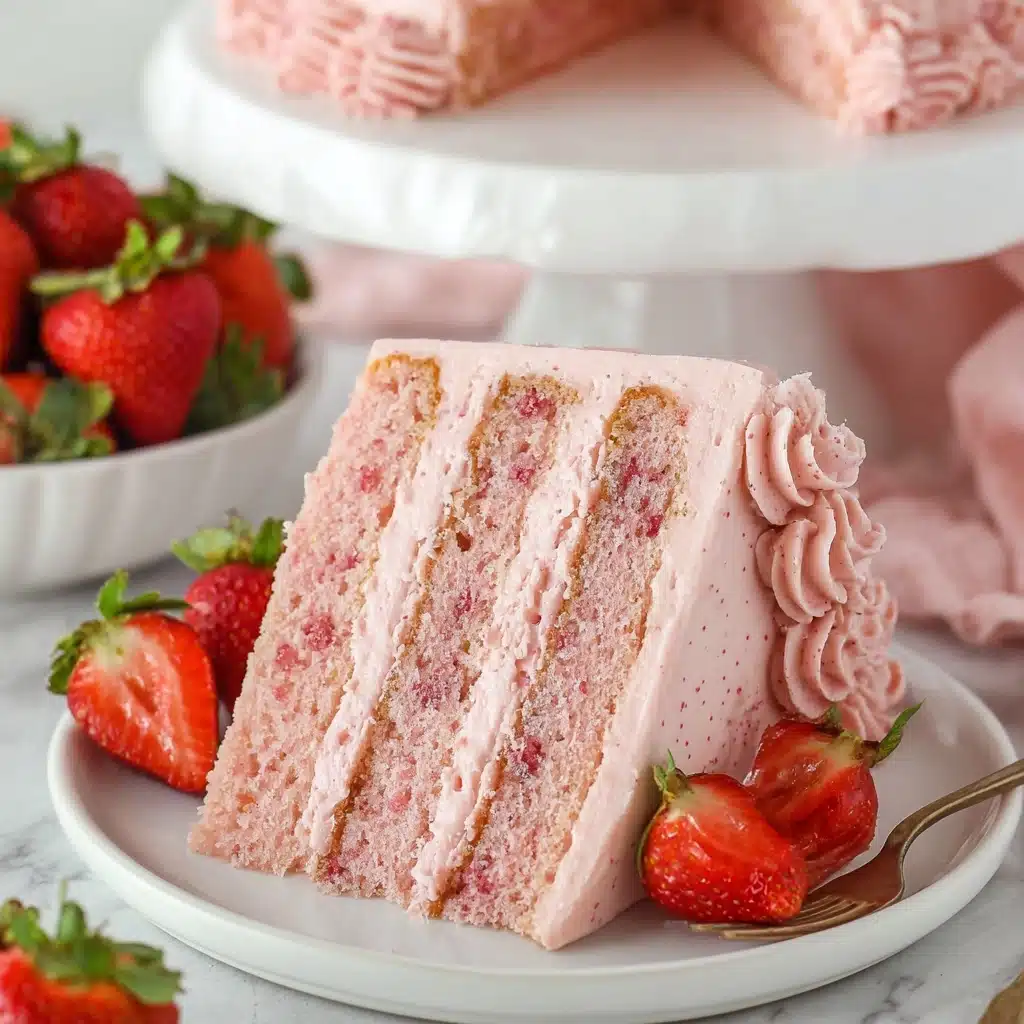
If you’re craving a dessert that absolutely bursts with real strawberry flavor, this Homemade Strawberry Cake is about to become your new obsession. Imagine soft, tender layers of pink-speckled cake made with a real strawberry reduction, stacked high with luscious strawberry cream cheese frosting and studded with pieces of fresh strawberries. Every bite delivers that sun-kissed strawberry taste, balanced by a tangy swirl of cream cheese and the most beautiful pink hue. It’s the perfect showstopper for birthdays, spring parties, or anytime you want to make someone’s day (including your own) just a little bit sweeter. Trust me, you won’t look at strawberry cake mixes the same ever again!
Ingredients You’ll Need
The beauty of this homemade strawberry cake is how its simple ingredients work together: each one adds rich flavor, tender crumb, or stunning color. Let’s give each ingredient its moment—after all, it’s these little touches that make your cake truly unforgettable.
- Strawberries: Fresh berries make the reduction, infusing the cake with a pure, intense strawberry taste you just can’t get from flavoring alone.
- Sour Cream: This adds essential moisture and the right amount of tang for a soft, tender crumb.
- Milk: A splash helps thin the batter just enough for that perfectly soft cake texture.
- Eggs: These give the cake structure and richness, keeping every layer light while holding it together beautifully.
- Vanilla Extract: A bit of classic vanilla brings a warm, round flavor that ties everything together.
- All Purpose Flour: The base for your cake—be sure to measure it properly for just the right crumb.
- Sugar: Lends sweetness and helps the cake brown while amplifying that strawberry flavor.
- Baking Powder and Baking Soda: These leaveners ensure your cake bakes up fluffy and soft with just the right rise.
- Salt: Even a pinch is crucial for balancing out the sweetness and bringing out the strawberry notes.
- Unsalted Butter: At room temperature, this gives richness, flavor, and a beautifully creamy crumb.
- Pink Food Color (optional): Just a few drops will amplify the vibrant, berry-pink color (especially fun for celebrations).
- Freeze Dried Strawberries: These intensify the frosting’s flavor, crushing into powder for the most naturally fruity icing ever!
- Cream Cheese: Silky smooth and tangy, it’s the perfect match for the strawberries in your frosting.
- Powdered Sugar: Essential for a smooth, spreadable, sweet frosting with zero grit.
- Chopped Strawberries: Folded straight into the frosting layers, they add bursts of juicy, real fruit throughout each slice.
How to Make Homemade Strawberry Cake
Step 1: Prepare the Strawberry Reduction
Start by washing and quartering your berries, then toss them into a food processor or blender and puree until completely smooth. Pour this brilliant pink puree into a saucepan over medium heat and cook, stirring frequently, until it thickens and reduces by about half—usually 20-25 minutes. The reduction is the secret behind that showstopping strawberry flavor, so resist the urge to rush this step. Let it cool before using—this step can even be done a day ahead.
Step 2: Preheat and Prepare Your Cake Pans
Preheat your oven to 350°F (176°C) and line the bottoms of three 8-inch cake pans with parchment paper, then generously spray the sides with baking spray. This ensures your beautiful homemade strawberry cake layers pop out effortlessly every time (no heartbreaking sticking here!).
Step 3: Mix the Wet Ingredients
In a large bowl, combine your cooled strawberry reduction, sour cream, milk, eggs, and vanilla. Once smooth, set aside about 1 cup of this mixture in a separate bowl or measuring cup; the rest (about 1 1/2 cups) stays put. This step divides your wet ingredients so the batter comes together extra velvety and airy.
Step 4: Make the Dry Mixture
Add your flour, sugar, baking powder, baking soda, and salt to a large mixing bowl and give it a quick stir so everything’s evenly distributed. This ensures even leavening and sweetness all throughout the cake.
Step 5: Add the Butter and Combine
With the mixer on low, add the softened butter in small chunks (about a tablespoon at a time). Let each piece fully incorporate before adding the next. This creates a texture like damp sand—an old-school bakery trick for super-tender crumb.
Step 6: Blend the Batter
Add the larger batch of your reserved egg/strawberry mixture (about 1 1/2 cups) to the dry-butter mix and blend on low until just combined. Scrape the bowl, ramp up to medium-high, and beat until fluffy and creamy (just 45 seconds to one minute does the trick). Stop, scrape down again, then slowly drizzle in the remaining wet mixture while the mixer runs. Finish with one last quick mix—your batter should be airy, silky, and perfectly pink. If you’re using food coloring, add it here for extra wow factor.
Step 7: Bake the Layers
Divide the batter equally among the three prepared cake pans and gently smooth the tops. Bake for 24-26 minutes, or until a toothpick inserted in the center comes out with just a few moist crumbs. Let the cakes cool in their pans for a few minutes, then carefully turn them out onto racks to cool completely. Patience pays off—fully cooled cakes mean dreamy, mess-free frosting later!
Step 8: Make the Strawberry Cream Cheese Frosting
While the cakes cool, add freeze-dried strawberries to a food processor and blend into a fine powder. In your mixer, beat room temperature butter and cream cheese until ultra-smooth and creamy. Gradually add half the powdered sugar plus vanilla, blend, then beat in the remaining sugar and strawberry powder. Add salt to taste, and prepare for your kitchen to smell like strawberry fields forever.
Step 9: Assemble the Cake
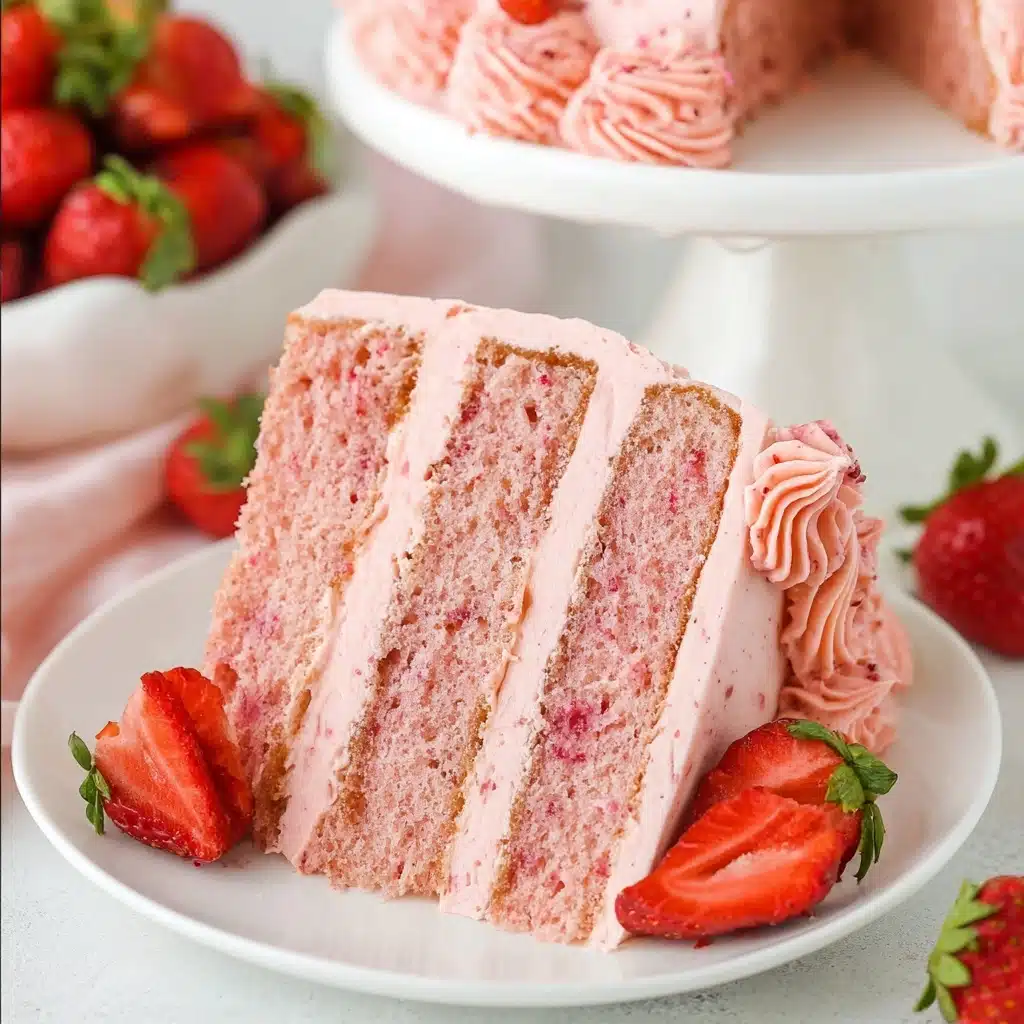
Carefully slice any domes off the cooled cakes so each layer is flat and even—this gives you that perfect bakery-style stack. Place the first layer on a serving plate, top with a generous cup of frosting, and sprinkle half of the chopped strawberries over the icing. Repeat with the second layer. Add your final cake layer, cover the whole cake with the remaining frosting, then pipe beautiful borders around top and bottom with your favorite star tip. Pile a few fresh strawberries on top for a dramatic finishing touch.
How to Serve Homemade Strawberry Cake
Garnishes
This cake truly shines with classic touches: dot the top with whole or halved strawberries, scatter a few freeze-dried berry crumbles for a splash of color, or swirl extra frosting into playful little rosettes along the edge. For a touch of whimsy, a dusting of powdered sugar or a sprig of fresh mint adds gorgeous contrast and a hint of freshness that echoes the cake’s berry flavor.
Side Dishes
Homemade Strawberry Cake pairs dreamily with a scoop of vanilla ice cream, lemon sorbet, or a spoonful of lightly whipped cream. If you want a brunch spin, serve thin slices alongside tangy yogurt and a platter of fresh berries. For celebrations, sparkling lemonade or fruity prosecco makes it feel even more festive.
Creative Ways to Present
Slice and stack it as a classic tall cake, or cut it into cubes for adorable mini strawberry cake parfaits layered with extra frosting, berries, and whipped cream in glass jars—picnic ready! Turn leftovers into cake pops by crumbling them with extra icing and dipping in white chocolate for strawberry shortcake vibes. However you serve it, the beautiful pink layers are guaranteed to catch every eye at the table.
Make Ahead and Storage
Storing Leftovers
Your homemade strawberry cake stays freshest when tightly covered in the refrigerator; just pop any leftovers into an airtight cake container or wrap well with plastic wrap. It keeps its flavor and softness for 3-4 days, so you can sneak a sliver whenever a craving strikes!
Freezing
If you want to get ahead, you can freeze the unfrosted cake layers well wrapped in plastic and a layer of foil for up to two months. Let them thaw overnight in the fridge before frosting. Even frosted slices freeze well (wrap them individually), so nothing goes to waste—just thaw in the fridge before enjoying.
Reheating
This cake is best served at room temperature. If chilled, simply set your slice out for about 30 minutes before eating for that ultra-soft, creamy texture and fullest flavor. There’s no need to microwave—letting the cake gently come to temp brings out all those fresh strawberry notes.
FAQs
Can I use frozen strawberries instead of fresh for the reduction?
Yes! Just thaw the frozen berries and drain off any excess liquid before pureeing. The flavor is still fantastic, and it’s a great option when strawberries are out of season.
What’s the secret to a really moist homemade strawberry cake?
A combination of strawberry reduction, sour cream, and butter makes this cake supremely moist. Don’t skip the reduction time, and be careful not to overbake—the result is a tender, flavorful crumb every time.
Can I make this cake as cupcakes instead?
Absolutely! Fill lined cupcake tins about 2/3 full and bake at the same temperature for about 20-22 minutes, or until a toothpick comes out with a few moist crumbs. Frost and decorate as desired—you might even want to sprinkle extra strawberry pieces on top!
Do I really need freeze dried strawberries for the frosting?
Using freeze dried strawberries is the best way to pack in real fruit flavor without watering down the frosting. If you can’t find them, you can skip, but the flavor and color won’t be quite as intense.
Can I make the cake layers ahead of time?
Definitely! You can bake the cakes a day or two ahead, wrap tightly once cool, and store in the refrigerator. That way, assembly is quick and easy when you’re ready to wow your guests.
Final Thoughts
There’s nothing like serving a Homemade Strawberry Cake made completely from scratch and watching it disappear slice by slice. The real fruit flavor, creamy frosting, and stunning pink layers come together in a dessert that truly tastes as joyful as it looks. I hope you give it a try—you might just find yourself becoming famous for this cake!

